HomeSchool Software: Page Rendering (Also ImageMagick Text Example)

Last couple days have had me working on the page rendering functionality of the HomeSchool software.  I’ve made some design decisions (for now) to speed up development like fixed 8.5″ x 11″ pages.  Hopefully later I will be able to go back and improve some aspects, but for now, time is of the essence.

Here is an example page render without the photographs included.  Still need a UI for selecting photographs and positioning them on the white area of the page.

At the bottom, see an ImageMagick Text Example about the python code used to render multiple text areas and color blocks on one image…

It took me a long time to figure out how to use ImageMagick to place multiple text areas on one image.  Here are some keywords for google:

ImageMagick, ImageMagick multiple text areas, ImageMagick pdf rendering, ImageMagick text.

      PrimerFont = join(App.Path, 'Static', 'Primerb.ttf')
      PrimerFontBold = join(App.Path, 'Static', 'Primer.ttf')
      RenderFile = join(TempDir, 'Render.jpg')

      # Build the full image
      subprocess.check_call((
        '/usr/bin/convert',

        # Setup the background
        '-size', '2550x3300',
        'xc:white',

        # Title Bar
        '-fill', 'grey14', '-draw', 'rectangle 0,0 2550,300',

        # Summary bar
        '-fill', 'RoyalBlue4', '-draw', 'rectangle 0,300 2550,600',

        # Description Bar
        '-fill', 'LightGrey', '-draw', 'rectangle 0,600 2550,1050',

        # Now draw the Name
        '(',
          '-density'    , '300',
          '-fill'       , 'white',
          '-background' , 'grey14',
          '-font'       , PrimerFont,
          '-size'       , '1650x150',
          '-gravity'    , 'West',
          '-pointsize'  , '20',
          'caption:'    + self.Book.Name,
        ')',
        '-gravity', 'NorthWest', '-geometry', '+150+150', '-composite',

        # Now draw the Date
        '(',
          '-density'    , '300',
          '-fill'       , 'white',
          '-background' , 'grey14',
          '-font'       , PrimerFont,
          '-size'       , '600x150',
          '-gravity'    , 'East',
          '-pointsize'  , '20',
          'caption:' + Activity.Date.strftime('%B %d, %Y'),
        ')',
        '-gravity', 'NorthEast', '-geometry', '+150+150', '-composite',

        # Now draw the Summary
        '(',
          '-density'    , '300',
          '-fill'       , 'white',
          '-background' , 'RoyalBlue4',
          '-font'       , PrimerFontBold,
          '-size'       , '2250x300',
          '-gravity'    , 'Center',
          '-pointsize'  , '20',
          'caption:'    + Activity.Summary.replace("\n", " "),
        ')',
        '-gravity', 'North', '-geometry', '+0+300', '-composite',

        # Now draw the Description
        '(',
          '-density'    , '300',
          '-fill'       , 'black',
          '-background' , 'LightGrey',
          '-font'       , PrimerFont,
          '-size'       , '2250x450',
          '-gravity'    , 'Center',
          '-pointsize'  , '14',
          'caption:'    + Activity.Description.replace("\n", "\\n"),
        ')',
        '-gravity', 'North', '-geometry', '+0+600', '-composite',

        # Now draw the Page
        '(',
          '-density'    , '300',
          '-fill'       , 'black',
          '-background' , 'white',
          '-font'       , PrimerFont,
          '-size'       , '2250x150',  #entire right half minus 150pt margin
          '-gravity'    , 'Center',
          '-pointsize'  , '14',
          'caption:'    + 'Page {0}'.format(self.PageNumber),
        ')',
        '-gravity', 'South', '-geometry', '+0+150', '-composite',

#        NameFile, '-geometry', '+0+0', '-composite',
#        DateFile, '-geometry', '+1275+0', '-composite',
#        SummaryFile, '-geometry', '+0+150', '-composite',
#        DescriptionFile, '-geometry', '+0+450', '-composite',

        RenderFile,
        ))

Home School Software Update: Portfolio Time

It’s that time of year again… Time to get the log and portfolio to the Altoona Area School District.  One problem — the software isn’t quite ready!

However, I’ve been making daily progress on getting the “output” working.  Here is how it is structured in this initial version:

  • You can create a book, “Eli Daniel Garber 2010-2011 Portfolio” for example.
  • Activities are added to the book, one activity per page.
  • The activity summary and description, date and pictures come along.
  • You can move the pictures around, crop, and choose the exact ones you want.
  • Pages in the book can be sorted any way you want.
  • Once the book is “ready”, you can output a print-quality PDF.  This PDF could be printed or sent to a printer to turn into a hardback book.
So far, we have recorded about 500 activities this year covering nearly 200 days — and we are still catching up on things that didn’t get entered.  One of the neat aspects of this project is to be able to really see what we’ve been up to all year.
Due to time constraints, I’m just focusing on getting good output.  Bells and whistles (chapters, cover pages, extra documents, table of contents, etc…) will have to come later.
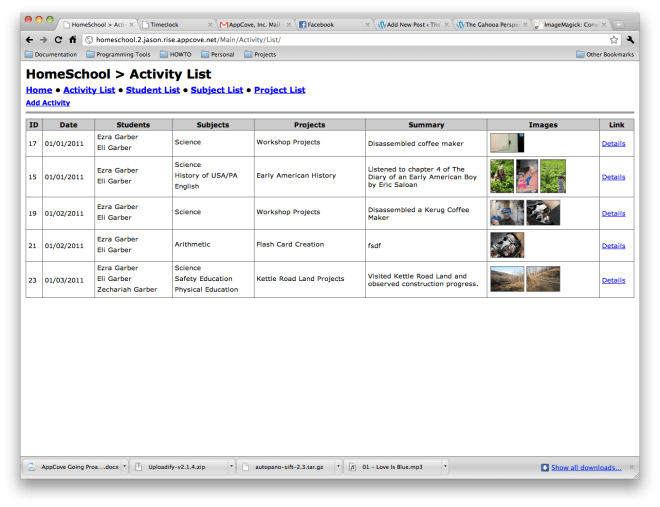
Also, I added extensive filtering to the activity list, to help make it faster and more manageable.  Here are a couple of screen shots:


Home School Software in Production Use!

Just an update on the use of our Home School software package…  So far, we have entered 216 activities with 462 images/scans across 13 projects, 12 subjects, and 4 students.

Nearly all of the photographs we take are with the Motorola Droid X.  Provided you have sufficient light, the quality is very acceptable.

Here is one of the latest activities recorded:

Home School Software: Inventory Tracking

Ever lose track of how much flour, sugar, milk, eggs, soap, razors, spices, motor oil, filters, nails, screws, glue, paper, staples, etc… you have on hand?

Ever shop based on hunger, rather than diciplined restocking?

Ever want to have an inventory of groceries at your house, so you don’t have to run to the store for everything?

Our objective is to keep consistent inventory levels of common products around the house, so we never run out of things that we should have on hand.  To that end, I’ve been adding some basic household inventory tracking data to the Home School software.  It has (or will have) the following features:

  • Areas — places that you store products (freezer, basement shelves, kitchen, bathroom, etc…)
  • Items — each “thing” that you want to keep in a given area (flour, sugar, toothpaste, etc)
  • Units — lbs, each, bottle, roll, case, etc…
  • Min Quantity — minimum amount to have on hand
  • Max Quantity — max quantity to have on hand
  • Check every [] days — how often should this item be checked?

From that data, you will be able to pull the following information out of the system:

  • All items and current inventory levels
  • Graphs of inventory levels over time
  • Which items (sorted by area) need checked now
  • What needs refilled (eg, the container of sugar in the kitchen, from the big bags in the basement)
  • What needs purchased (40 eggs, 24 rolls of TP, 10 lbs of sugar)

You will be able to pop on, print out a list of items that need inventoried, and hand it to the kids with a pencil and clipboard to go about filling out how much there actually is.  Excellent math practice, especially if you deal in raw units like oz, lbs, quarts, etc… — the students will have to add/multiply/convert the units that are on the items they are counting.

For Example, you could specify that you want 4 bottles of dish soap around, or 96 ounces of dish soap around.  The difference is that they will need to multiply 24 oz per bottle * 3 bottles on hand = 72 ounces — time to buy another bottle.

Here are some early screen shots:


Home School Software now supports Images!

Today I got to a great milestone with the homeschool software I discussed here.  It now has excellent image support.

For every activity, you can attach an unlimited number of images.  They are stored in the database with all of the other data, so it’s easy to backup.  Also, I am using ImageMagick to resize them into various preview sizes for quick speeds while working with them.

I used uploadify to power the image uploader and ImageMagick to resize them into preview sizes.

Here is a screen shot of the list page:

And a screen shot of the details page: