How to install a Trusted Certificate Authority on Windows 7

At my company AppCove, we have our own certificate authority that we use with development servers and sites.  This allows us to (at no additional cost) use HTTPS and SSL for all of these alternate domains and subdomains.

The downside is that our certificate is not trusted by any stock browser or operating system.

Therefore, to prevent getting an ugly and scary SSL warning, anyone who needs to visit these (private audience) sites must first “trust” our certificate authority.

A note on security.  If you are telling your computer to trust a certificate authority, then you must really actually “trust” that authority.  If the signing key fell into the wrong hands, then they could create fake certificates for other sites you visit, like http://www.google.com, and intercept your data.  At AppCove, we use aggressive security measures to protect the certificate authority key (as we do for customer data and applications).

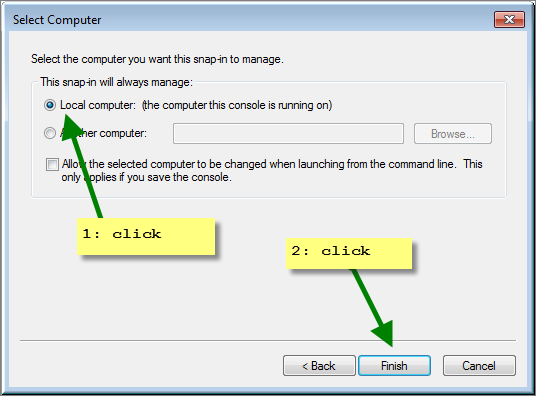
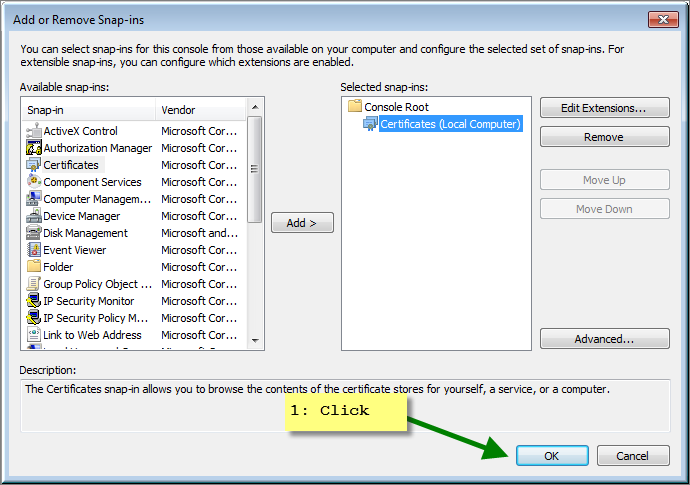
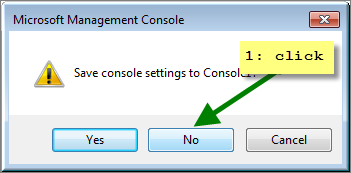
In this example, I am causing my Windows 7 workstation to trust appcove-ca-cert.pem.crt

a

b

c

d

e

f

g

h

i

j

k

l

m

n

— Start of slight detour — 

If you want to verify it was installed, do this.  Otherwise, skip the next 2 screens.

o

p

— End of slight detour —

q

r

At this point, you should be able to visit any HTTPS site that was signed with this certificate authority and your browser will indicate that it is a secure connection.

Spiders and bees and really small toads?

This photograph is of what appears to be a very small toad.  The item beside it is a 1/2″ diameter section of rebar, making this little critter about 1/16″ long.  I barely saw him.

IMG_2302

This bee appeared to be out it the cold a bit too long and was pretty sluggish.  This is taken on the back of by glove.

IMG_2754

Here is a daddy long leg in the garden, running as fast as he could.

IMG_2749

nginx: how to specify a default server

Several years ago when I started using nginx, I was under the mistaken assumption that

server_name _;

was a wildcard server name and would be used if no other server names matched.

Nope.

I made a change on a production system, adding a new site on an existing IP address.  What harm could that cause, right?

After several clients quickly and graciously notified us that the wrong site was coming up when you visited their domain, I quickly tracked the problem down.

First you need to realize that server_name _ is actually not special.  It is just a non-match.

Second you need to realize that in the event of no matches, nginx will select the first server{} block and use that.

This means that the ORDER of your server blocks is critical if you are using `server_name _;`. 

In our case, the order was incorrect, and my new domain was picking up all requests for that IP address.  I tell this because I believe a number of system administrators have this incorrectly configured and waiting to bite them.

There is a better way.

The nginx `listen` directive includes a `default_server` option that looks like this:

server{
   listen 1.2.3.4:80 default_server;
   ...
}

From http://wiki.nginx.org/HttpCoreModule#listen

If the directive has the default_server parameter, then the enclosing server {…} block will be the default server for the address:port pair. This is useful for name-based virtual hosting where you wish to specify the default server block for hostnames that do not match any server_name directives. If there are no directives with the default_server parameter, then the default server will be the first server block in which the address:port pair appears.

The moral of the story

It is better to use the correct mechanism (above) than relying on a single non-matching server_name.

I hope someone finds this useful!

Reference: http://stackoverflow.com/questions/9454764/nginx-server-name-wildcard-or-catch-all


Building Plywood Shelves

“A place for everything and everything in its place”

http://www.phrases.org.uk/meanings/14400.html

It is an ongoing chalenge to find a proper place to keep everything.  But in that lies the key to being organized.  It is fairly easy to put everything away when everything has an “away” to be put into.

In an effort to implement that, we decided to use an otherwise useless corner of the dining room to make shelves for bins and books.  Rubbermaid makes some really nice bus boxes which are sold at Sams Club.  They look like this:

imgres

This is one of the few actually nice storage-related items you can purchase nowadays.  The quality is second to none.  It is an impressive (proper) use of plastic.

Because I lack a dust collection system, all of the routing and cutting was making the shop too dusty to be in comfortably.  So we went outside.

IMG_2773

All of the sanding was done by hand (Thank you ELI and EZRA):

IMG_2772

The shelves were constructed of 23/32″ SandedPly plywood from Home Depot (about $45/sheet).  I ran out of that and used an alternate USA made maple-faced hardwood plywood for one of the shelves.  You can really see the difference.  We routed a groove for each shelf using an aluminum guide, palm router, and 3/4″ bit.

IMG_2836

They were stained with MinWax Espresso stain.

IMG_2837

Predrilling really helps smooth the assembly process.  Notice the metric ruler?  More on that later.

IMG_2840

Because the shelves are not designed to disassemble, they were screwed together and then slid into place and screwed to the wall.

IMG_2841

And the result was great.  As you can see, a secondary bookshelf is integrated to help keep the growing collection of schoolbooks.

IMG_2844

And as per the usual tradition at our home, a bit of “alternate” use before we start with the real use:

IMG_2847

MakerBot Replicator 2 Tip: First Layer Just Right

Talking about the MakerBot Replicator 2 3D Printer

Last post I talked about what happens when the nozzle is too far away from the build plate when you are starting a build.  This post will discuss what a proper distance looks like.

Remember proper setup:

  1. Blue tape.  Flat.  No wrinkles.  I use 3″ or 2″ with the advantage of 3″ being that it is quicker to apply.
  2. Rubbing Alcohol wipe down of tape!!!  I use 91% (can buy at Walmart)
  3. Flat Build Plate.  I purchased a glass one from Amazon.com and it really did help.
  4. Leveled Build Plate.  All I will say now is a sheet of printer paper where you can barely feel the drag.  More on this later I hope.

The print in this discussion was standard quality.  I slow it down a little bit to 70mm/sec during printing.  I find the MakerBot doesn’t shake so much at the expense of slightly longer print time.   I also heat it up a little to 235C which seems to be helpful for me.

Here is what we are building (at a whopping 110mm x 110mm x 100mm):

8-11-2013 12-30-58 AM

This is a good sign that the print is getting off to a good start.  See how each outline is nicely pressed flat, but no scraping is apparent?

IMG_2514

IMG_2516

This is the front-left corner, the first printed. Notice how with few exceptions, each line is flattened just enough to merge into the adjacent line?

IMG_2520

This is the front-right corner. The build plate must be too low here (not level) or the machine is out of alignment.  You can see the nozzle isn’t close enough.  What this might result in is a slight lift on a large part, but it is unlikely it will break away and cause problems.

IMG_2527

This is the beginning of the second layer, and the time I left for 6 hours.  I was comfortable that little would go wrong with the print at this point.  Layers adhering correctly, build adhering correctly.

IMG_2528-001

Here is a side-view of the print in progress. This is 0.20mm layer resolution, and it looks fine.

IMG_2534

Here is a top-view of the same.

IMG_2536

Here is the finished build:

IMG_2543

This is stuff I have figured out by trial and error, so I hope these pictures help!

Get a good putty knife, because with the above method, the print will REALLY stick to the platform.  I’d rather it over-stick to the tape than come off and fail (possibly breaking the printer).

MakerBot Replicator 2 Tip: First Layer Not Close Enough

We’ve been printing using PLA on scotch blue painters tape.  I’ve learned a lot about how critical the first layer is.  If you get it too thin, then it just barely smears on and will clog up the extruder.  That can cause issues with subsequent layers not bonding correctly (in my opinion).

If you get it just right, and your tape is clean (alcohol wiped), then the PLA will stick very well to the tape.  Maybe too well. 

If you get the nozzle too far away, then the model doesn’t stick. Here is a picture of a bad first-layer (not close enough).

IMG_2382

This model peeled up during printing and broke the cooling fan ductwork on the extruder head.  Baaaaadddd.  If you see a print starting like that, best to abort it and start over.

IMG_2396

MakerBot Replicator 2 – Arduino Bumper

I was using a piece of foam rubber under my Arduino for the Marble Roller project.  Not so nice, right?

Having a brand new MakerBot Replicator 2 on my desk, I decided to, well, make a nice bumper (or 3).

No design time needed as someone else did the hard work: http://www.thingiverse.com/thing:26237

Printed out wonderfully.  Fits perfectly.

IMG_2375

IMG_2376