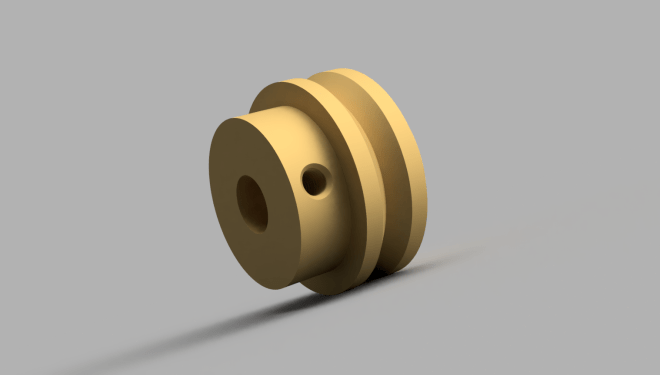
Stain Dipper Upper Pulley

The Stain Dipper is taking shape one component at a time.  We have the servo controller, servo motor, brass for pulleys, bearings, blocks of UHMW Polyethylene for supports, taps, set screws, aluminum rods, shafts, an Arduino Mega, buttons, switches, power supplies, wire, and more…

Here are some views of the upper pulley system.

Free_Pulley_Assembly_2018-Jul-03_05-07-33AM-000_CustomizedView6207873165

Free_Pulley_2018-Jul-03_03-14-42AM-000_CustomizedView48552900108

MakerBot Replicator 2 – Arduino Bumper

I was using a piece of foam rubber under my Arduino for the Marble Roller project.  Not so nice, right?

Having a brand new MakerBot Replicator 2 on my desk, I decided to, well, make a nice bumper (or 3).

No design time needed as someone else did the hard work: http://www.thingiverse.com/thing:26237

Printed out wonderfully.  Fits perfectly.

IMG_2375

IMG_2376

Arduino Marble Roller #2

Here is an update to the marble roller project.  We are using foam board and hot glue for construction.  This is a surprisingly strong construction method for prototyping and projects like this.

In the foreground is a new stepper motor.  Not sure if we will be using it or not for this project yet.

Marble Roller

Arduino Bipolar Stepper Circuit

I got a cool little 4-wire bipolar stepper motor and wanted to drive it via Arduino.

I based the design on this reference: 

http://arduino.cc/en/Reference/StepperBipolarCircuit (credit for following image belongs there as well)


bipolar_stepper_four_pins

Here is how it looks for real.  Kind of a mess of wires, but you know what?  It works great.

IMG_2031


Arduino, Transistors, Motors, and LEDs

Well, the fun is increasing with Arduino.  We hooked up some circuitry which enables a transistor to switch a fairly large 12V load via a very small 5V digital pin on the Arduino board.

This has been a great learning resource: http://www.kpsec.freeuk.com/trancirc.htm

Basically, we have 12V power going through a motor circuit (protected by a signal diode), and then to the collector of a transistor.  The emitter of the transister is connected to ground.

Lastly, the Arduino ground is joined with the emitter, and the transistor is switched by a 5V digital output pin on the Arduino board.

Now, just need to find something useful to do!


Fun with Arduino

Ok, so if you haven’t heard about it, Arduino is a really cool piece of “open source hardware”.  In simple terms, it is a single board computer with a number of analog and digital inputs and outputs, that can be programmed from your computer, but run independently.

Arduino is an open-source electronics prototyping platform based on flexible, easy-to-use hardware and software. It’s intended for artists, designers, hobbyists, and anyone interested in creating interactive objects or environments.

I recently got this starter kit from Amazon.com:

And have since been playing with making different circuits, etc… It has been a good experience in working with lower level electronics (ohm’s law, etc…)

Hope to post more soon!