Stain Dipper Machine – Lathe Work

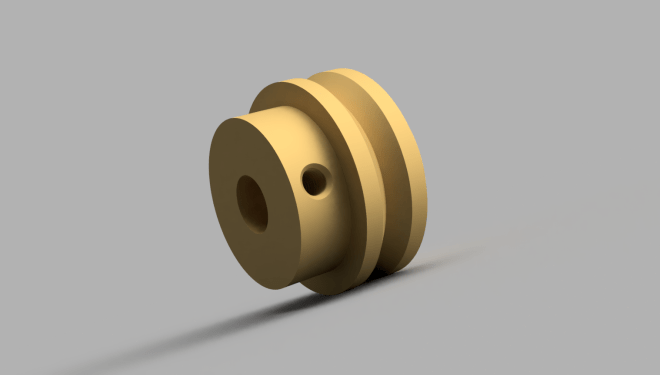
In the Stain Dipper Machine, we have a top pulley which is mounted on a 10mm shaft that is seated in 10x26x8mm bearings.  In the last post on this topic, I showed the pulley holder assembly.  In this post I’ll show the pulley and the final assembly.

Here is the finished pulley, made from a 1″ long by 1.5″ diameter piece of brass.

IMG_2253

Here is the pulley mounted on the top of the machine.  This is a satisfying point in the project because of all the ways this could have been solved, we chose an elegant, smooth, and accurate one.  You can’t buy this specific part anywhere in the world – we designed and made it just for this purpose.

IMG_2255

Here is a picture of tapping the pulley for a M5 set screw.

20180713_000439

This is a picture after the first operation was complete.  Now we need to turn it around in the lathe, recenter it, and finish the other side.

IMG_2247

Here is a picture of the part in the lathe.  Notice the difference in surface finish?  The shiny area is freshly cut.  The dull area was original surface.  The semi-dull area was shiny just an hour before, but oxidization got to it that quickly.

IMG_2248

A view of the spinning 4-jaw chuck and quick change tool post.

IMG_2234

Example of Python Generator Function.

One of the great features of Python is Generator Functions.  Generator functions allow you to convert any function to a generator function by simply including the yield keyword somewhere in the function body.  When a generator function is called, the response is a generator object, which can be iterated over among other things.

To boil this down to basics, generator functions allow you the programmer to create a function which yields one value at a time (and pauses until the next value is requested) until you decide it is done.  This opens endless possibilities for converting sequences, creating sequences, filtering, and more.

The following example is a generator function which will take a simple list or iterator and return pairs of (element, previous_element).  This is a great use for generators and the yield statement.

Generator Function:

def lineandlast(listish, first=True, last=True):
    iterator = iter(listish)
    lastline = next(iterator)

    if first:
      yield lastline, None

    for line in iterator:
        yield line, lastline
        lastline = line

    if last:
        yield None, lastline

Example:

for line, last in lineandlast([1,2,3,4,5]):
    print(line, last)

Output:

1 None
2 1
3 2
4 3
5 4
None 5

Notes:
There are two keyword arguments, first and last, which can be used to control the output of the first and last items on the output example above.

Stain Dipper Machine Top Pulley Assembly

One of the key components in the Stain Dipper Machine is the top pulley assembly.  It is crucial that it normalizes the unspooling location of the cable so it does not put lateral forces on the slider rod below.  To this end, we designed and created 3 components out of UHMW (Ultra High Molecular Weight Polyethylene).  It’s a nice plastic to work with, and super tough.  It cuts like butter but has a lot of strength too.  This is a 10mm hardened shaft with two bearings pressed into the UHMW.

2018-07-11 - 121824

Here is a picture of the 3D model.  As you can see I haven’t trimmed the shaft yet.

2018-07-11 - 122003

Stain Dipper Slider Guide

In my last post I had an image of one of the guides and the slider in the background.  The slider is an aluminum extrusion and the guide is 0.75″ thick Oil Filled Nylon.  Nylon is resistant to stain and other chemicals we are using as well as having a low friction coefficient.

Here is a close up of the 3D Assembly taken straight from my computer screen.

2018-07-10 - 174917

Here is a photograph taken with my phone of the actual part that has been machined and installed.  There is something satisfying about designing something and then making it exactly (within tolerance) to the size and shape you wanted.

20180710_135432

Stain Dipper Parts

Here is a screenshot of some of the parts we’ve designed for the Stain Dipper.  All of the mechanical parts are in the design and correctly positioned and all the hardware has been ordered…

Here are several of the parts from Fusion 360

Fusion360_2018-07-05_02-41-05

Here is a servo motor mount and custom made pulley.

Frame v27

Here is a small piece of Nylon used to connect a 1/16″ cable with a aluminum tube.

Fusion360_2018-07-03_22-27-15

Stain Dipper Upper Pulley

The Stain Dipper is taking shape one component at a time.  We have the servo controller, servo motor, brass for pulleys, bearings, blocks of UHMW Polyethylene for supports, taps, set screws, aluminum rods, shafts, an Arduino Mega, buttons, switches, power supplies, wire, and more…

Here are some views of the upper pulley system.

Free_Pulley_Assembly_2018-Jul-03_05-07-33AM-000_CustomizedView6207873165

Free_Pulley_2018-Jul-03_03-14-42AM-000_CustomizedView48552900108

Stain Dipper

We’ve been doing some research into air knives and considering ways to make staining of thousands of small parts faster.  Dip it into the stain, and have a captive air knife blow the excess off (dripping back into the bucket) as the part is pulled out.

The PVC tube will be hinged so it can be opened for cleaning.  The air knife assembly will be near the top of the tube.

Did some checking on PVC compatibility with stain and it seems to be acceptable: https://www.berlinpackaging.com/insights/chemical-guidelines-for-plastic/

Here is a possible air knife kit. http://www.exair.com/index.php/products/air-wipes/super-air-wipe/saw-kit.html

Now just need to design the servo motor mounts, air knife mount, and misc. other structural components.

Fusion360_2018-06-18_00-14-56

Fudge Version 2

Fudge version 2.  (Version one wasn’t good enough to write about).

This is a cross between two recipes that I learned about.  I made use of some of the techniques but did not follow the recipe that Alton Brown explains so well in his episode “Fudge Factor” at https://www.foodnetwork.com/shows/good-eats/episodes/fudge-factor

Fudge V2

… start with …
2 3/4 cups sugar
1 cup cocoa
1/4 cup corn syrup
1/4 stick butter
1 cup milk

… and later …
1/2 stick softened butter
1 tbsp real vanilla extract

… and if you want…
Cocktail peanuts (or walnuts or whatever)

Put the “start with” ingredients in a saucepan over high heat and stir constantly with a wooden spoon until boiling.  I tried covering it as Alton Brown said, but it just tried to boil over, so maybe I did that wrong?

Turn heat down to medium low and DO NOT TOUCH IT.  As soon as the temp hits 232F, turn off heat and just let it set there.   Place a small amount of butter on the top to prevent it from drying out.  Let it sit undisturbed until it is 110F…. then…

Dump in the “and later” ingredients and stir it AS HARD AS YOU CAN with a wooden spoon.  When it starts feeling like it’s time, maybe losing it’s sheen, maybe starting to get stiff, it’s time to dump it into a parchment paper lined 8×8 pan before too late.

I then poured the peanuts on top and worked them down in with a spatula.   I though it was ruined, because it just wasn’t setting up.

But I got up the next day and sure enough it was perfect.